Clients
There are four active clients to connect and interact with Ethereum network, ordered here by popularity: Geth, Parity , Eth and AlthZero. They all enable you to execute Ethereum programs on your computer.
When it comes to choose a client, best is first to evaluate what you will do on the network. If you have a laptop or desktop machine and will essentially use Ethereum as a paiement service, you should probably just install the Ethereum Wallet and you are done. The Ethereum Wallet is a “single dapp” deployment of the Mist Browser which will be the centerpiece of the Metropolis phase of development, which comes after Homestead.
If you want to interact with Ethereum on the command-line, and to take advantage of the Javascript console then you will want to install one of the above mentioned client.
And last, if you plan to do mining, please visit the mining section.
The wiki will stick to the two most popular clients, Geth and Parity. Please visit Etherdocs: choose a client in case you are interested by any other ones.
Geth
TO WRITE
Parity
Parity is an Ethereum client, written from the ground-up for correctness-verifiability, modularisation, low-footprint and high-performance. It utilities the Rust Rust programming language, a hybrid imperative/OO/functional language with an emphasis on efficiency. You will find here a chart showing the efficiency of this client compared to geth or eth.Parity is professionally developed by Ethcore.
As pointed by Vitalik Buterin in this tweet, it is highly recommended to connect to Ethereum with this client, especially with minimum version number 1.2. It seems Parity is gaining traction among the community and may become the upstream ethereum client.
Parity runs on Linux, Mac OS and windows.
Build and install
You can build parity from source following github instructions and this tutorial from Ethcore. You may too install binaries if your Linux distribution have such a package. Please visit the parity page on Ethcore to download binaries or a Docker image. Archlinux users will find two packages in the AUR repository. The build and installation should normally go smooth if your machine is up to date and correctly setup.
Once the package is installed, run $ parity -v to check the installation went fine. The command shall return the installed version and the license.
Configuration
There is no man page but you can run $ parity --help to see a list of options and default settings. You will see that configuration settings are stored in the~/.parity folder. To run basic parity, first be sure to own a key.
Key management
$ parity account list shall return a list of your Ether accounts. If you already had some keys before parity installation, this command will return a list of them:
 % parity account list
Known addresses:
0XXXYYYYYZZZZZZZZXXXXXYYYYYYYY
If you do not have any key, run $ parity account view to create one.
The key shall appear in your ~/.parity/keys/ directory. To view details on your key, run $ cat ~/.parity/keys/*
Connect to network
The simple following command will start parity: $ parity . By default it will connect to other nodes on the Ethereum Homestead network and synchronize the blockchain. Since build 1.2.0, JSON-RPC and dapps server are enabled by default. You may still want to specify the pruning method to avoid too large archiving.
You can run parity alongside geth on your machine, even if one client only is needed. In case you run both, please add the –-geth option to the parity command. Below is an example how to start parity with no geth daemon running:
$ parity --pruning=fast --port 30305 --jsonrpc-port 8081 --unlock MyEtherAddress --password MyFile --identity MyNode
with MyEtherAdress being your Ether account address; password the file containing your password account; identity the name you want to give to your node.
Run $ partity --help for an exhaustive list of options.
Start parity with systemd
Edit the parity.service file
[Unit]
Description=Parity Daemon

[Service]
EnvironmentFile=%h/.parity/parity.conf
ExecStart=/usr/bin/parity $ARGS

[Install]
WantedBy=default.target
Edit the parity.conf file
ARGS="--identity MyNode --pruning=fast --port 30305 --jsonrpc-port 8081 --unlock MyEtherAddress --password MyFile"
Move the service file in your systemd user service file directory (usually ~/.config/systemd/user or /etc/systemd/user), move the parity.conf wherever you want as long as its path is correctly set in your service file.
Run
$ systemctl --user start parity.service to start the daemon
$ systemctl --user status parity.service to monitor the status
$ systemctl --user enable parity.service to start the service automatically at boot.
Run Parity with Mist
As of version 1.2, Parity works with the Ethereum Foundation Wallet ("Mist").
Look here for prebuilt binaries of Mist. After installation, configuration files will on Linux will be on ~/.config/Mist directory. Before starting Mist, make sure Parity is running in Geth-IPC-compatibility mode: start parity with the –geth option.
Now start Mist as you normally would. It will connect to ~/.ethereum/geth.ipc socket if everything is correctly setup.
Import a chain from Geth
On 1.2 and above, use Geth's export feature along with Parity's import. Run the following command to import a previously downloaded chain from Geth.
$ mkfifo /tmp/chain.rlp && geth export /tmp/chain.rlp && sleep 1 && parity import /tmp/chain.rlp
Syncing
When you first run an Ethereum client, It will first need to sync with the current blockchain. Depending on your client, system, bandwith, this action can take very long, up to a few days. Please visit this ethereum stackexchange post for tips.
Visit the ethstats website to check last block number, and compare it with the block you are syncing on your machine. Once they are the same, you know your client is synced.
Run parity on Windows 10 OS.
Steps
- Download the following release(1.2.0).
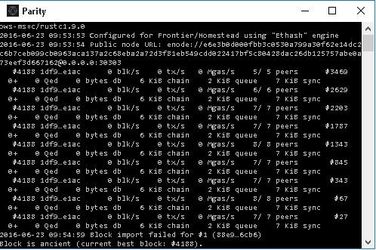
- Run parity.exe and you would see a command line like the one below pop up.
- If you intend to run parity with mist, run parity with --geth option to ensure mist compatibility.
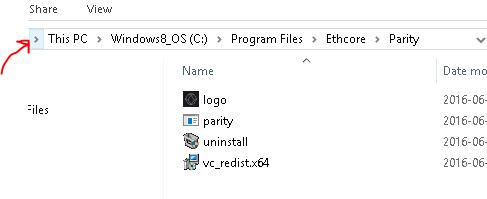
- Navigate to where parity is installed on your OS.
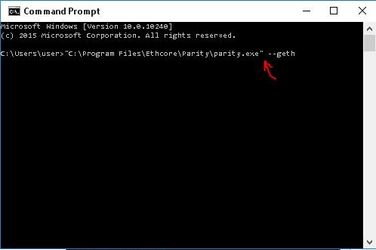
- Drag parity.exe file and drop onto your command line interface and add '--geth' as shown in image below.
- Download and run Mist 0.7.6.
- Navigate to where parity is installed on your OS.
- If you intend to run parity with mist, run parity with --geth option to ensure mist compatibility.
- Then your default browser should navigate to the following URL 'http://localhost:8080/home/, ' automatically.
if not type in the address bar 'http://localhost:8080/home'.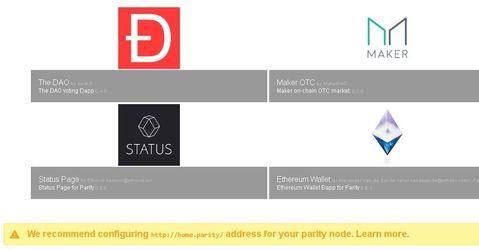
- Configure your proxy by following the instructions when you click 'Learn More'
- Chrome
- Navigate to settings, click 'Advanced settings', under 'Network' click change proxy settings,
- Click 'LAN settings'
- Select 'automatic configuration script' and copy and paste the following: http://localhost:8080/proxy/proxy.pac into the address input box.
- Click Ok.
- Chrome
- Point your URL in your browser to http://home.parity/ , you should see the following image if it worked perfectly. You would notice the absence of a yellow triangle.

- That's it, your all set.
Errors:
TO WRITE